As a newcomer to the computer security world working on my first paper, No Harness, No Problem: Oracle-guided Harnessing for Auto-generating C API Fuzzing Harnesses, I inevitably spent countless hours studying, building, and running fuzzing harnesses. This guide aims to answer the questions and issues I struggled with early on, along with common mistakes and topics I’ve since helped others work through.
Getting started in this space can feel daunting, but I hope this blog post can serve as a resource for those who are interested in beginning their fuzzing journey. Below, I outline the harness development process from beginning to end, with a special focus on harnessing and fuzzing software libraries. Keep in mind that this is an iterative process and it’s rarely a one-shot attempt, so don’t be afraid to get stuck or make mistakes!
Prerequisites
Linux Ecosystem and the Command Line
The guidance offered in this post is primarily centered around working in the Linux ecosystem. Familiarity with shell commands is encouraged, and knowledge of basic tasks like setting environment variables, installing packages, and leveraging build systems will be helpful.
Familiarity With Compilers
One of the biggest headaches when it comes to developing a fuzzing harness is actually building both the target and the harness itself. Debugging during this stage is likely, so a basic understanding of compilers and their usage is encouraged. Nevertheless, in the build process section I cover the absolute necessities.
AFL++
AFLplusplus is today’s state-of-the-art fuzzing engine for most security practitioners. This tool allows you to simply plug in a fuzzing harness and let AFL++ worry about the other complex aspects of fuzzing like seed scheduling, input mutation, and more. To learn more about what AFL++ does, I’d encourage checking out its landing page on GitHub.
Choosing your target
When it comes to actually finding a target to fuzz, there’s unfortunately no universal approach, but there are important properties to look for that indicate a strong target.
Clear “Injection” Points
Since the dawn of fuzzing in 1988, software that interacts with user-controlled inputs has been a primary target for bug discovery. For example, the objdump command line utility is a strong fuzz target because its functionality revolves around parsing user-provided binary files. Fuzzing objudmp allows us to throw millions of such files at it and discover buggy behavior like this!
This same principle applies to harnessing. Especially for those new to fuzzing, I would recommend targeting a system that has a clear “injection” site. For example, let’s take a look at the below function provided by libucl.
/**
 * Load ucl object from a string
 * @param parser parser structure
 * @param data the pointer to the string
 * @param len the length of the string, if `len` is 0 then `data` must be zero-terminated string
 * @return true if string has been added and false in case of error
 */
UCL_EXTERN bool ucl_parser_add_string (struct ucl_parser *parser,
        const char *data, size_t len);
By looking at its signature, we can see the ucl_parser_add_string function consumes user input through a string buffer and adds it to the provided ucl_parser struct. This is a great target as it clearly demonstrates an injection site for user-provided data.
Finding injection sites for a new target is not always straightforward—it’s a bit of an art in and of itself—but this is an important step when it comes to narrowing in on a target. These sites serve as the main method for feeding fuzzer-generated inputs into the target in a meaningful way.
Room For Novelty
When considering a fuzz target, we ideally want to be on the frontier of bug discovery, exploring the “Wild West🤠” of under-tested code. For example, if a library has been “fuzzed to death” (i.e., it has been actively fuzzed by strong harnesses for a significant amount of time), the odds of discovering a new bug by targeting the same code is low. This is an important consideration when the goal is to discover new bugs. Before deciding on a target, it’s helpful to ask “What aspect of this system is under-tested?” and “How can I target that and reveal new behavior?” If the answers to these questions are clear, this is a great point to start from.
High Impact (Bonus Points!)
As a general note, always act responsibly. If you discover a bug while fuzzing, please follow coordinated disclosure practices and report it through the appropriate channels.
Fuzzing high impact software can be especially powerful when it comes to bug discovery, as their effects have the potential to be wide-reaching and extremely consequential in some cases. High impact can mean different things depending on the context, but software that is widely used or is critical to a valuable product or service certainly fits the bill.
The Build Process
Now that we’ve chosen our target, we can get started with building our harnessing ecosystem. Unfortunately, the build process for harnessing is largely target-dependent with wide variability, but I aim to provide general advice common to most targets. As a helpful resource, I’ve linked a Makefile I wrote to demonstrate this exact topic for our University of Utah CTF team here!
Building the Target
The goal of this step is to build our target with AFL++ instrumentation, allowing its compiler to inject coverage tracking functionality into the library. In my experience, most targets use either the Autotools or CMake build system, so below I provide details about a few important components of each that are helpful during the build process.
Autotools
The configure script provided by a target allows users to provide common compiler flags such as CC and CXX. These flags allow us to tell the build system to use AFL++-provided compilers rather than traditional clang or gcc. In a lot of cases, it’s truly as simple as:
./configure CC=afl-clang-fast CXX=afl-clang-fast && make all
Other helpful flags or arguments include CFLAGS, CXXFLAGS, and --(enable/disable)-(static/shared)
CMake
Similar to Autotools, when instrumenting with CMake, our goal is to simply tell the build system we want to use an AFL++-provided compiler. To perform this with CMake, we can use the -DCMAKE_C_COMPILER and -DCMAKE_CXX_COMPILER flags. Again, other helpful flags include -DCMAKE_C_FLAGS, -DCMAKE_CXX_FLAGS, and -DBUILD_SHARED_LIBS.
As a side note, if all else fails, afl-qemu uses dynamic instrumentation to enable fuzzing for systems that are not built with AFL++ instrumentation. Information about that can be found here.
Building the Harness
This step ensures that the harness is correctly linked and loaded against our instrumented target. This is where familiarity with compiling is helpful, but I’ve detailed a few important aspects below.
Including Header Files
The harness must include the header files of the target that provide declarations for the library-specific properties used by the harness. For example, when calling the ucl_parser_add_string function in our harness, we must make sure the harness also includes ucl.h, as this provides the function declaration.
-I flags
During compilation, the -I flag must provide the path to the header file included in the harness. For example, if our harness is located at lib/harness.c and the header file is located at lib/libucl/include/ucl.h, our -I flag should point to lib/libucl/include.
-L & -l flags
While header files provide the declaration of a given function, we also must include its actual implementation. The -L flag should provide the path(s) to the .so or .a library file(s) produced during the build of the target. Finally, the -l flag should describe the name of the library to be used. The combination of these two flags essentially tells the compiler where to find the library, as well as the exact library to link against.
Again, for more examples, I highly recommend checking out the Makefile in this demo to get an idea of how this works in practice.
Putting It All
The code below is a fuzzing harness that feeds AFL++-generated inputs to libucl through the function ucl_parser_add_string.
#include <stdio.h>
#include <errno.h>
#include <unistd.h>
#include <ucl.h>

int main(int argc, char **argv) {
    //Read input from file and store it in a buffer
    FILE *f;
    char *data = NULL;
    long size;

    if(argc < 2)
        exit(0);

    f = fopen(argv[1], "rb");
    if(f == NULL)
        exit(0);

    fseek(f, 0, SEEK_END);

    size = ftell(f);
    rewind(f);

    if(size < 1)
        exit(0);

    data = (char*)malloc((size_t)size+1);
    if(data == NULL)
        exit(0);

    if(fread(data, (size_t)size, 1, f) != 1)
        exit(0);

    // create a parser to use later
    struct ucl_parser *parser;
    parser = ucl_parser_new(0);

    // start passing fuzzer-generated input into the library
    ucl_parser_add_string(parser, data, size);

    // check if any errors occur. If they do, exit
    if (ucl_parser_get_error(parser) != NULL) {
        return 0;
    }

    // free up allocated memory
    ucl_parser_free (parser);
    return 0;
}
Start Fuzzing!
Phew! We’re almost there. Now we can get to the fun stuff. For this section I’ll describe the minimal commands needed to get a fuzzing trial up and running along with common mistakes and pitfalls I’ve seen along the way that result in ineffective fuzzing trials.
To begin fuzzing, it’s typically as simple as:
afl-fuzz -o <output_dir> -i <seed_dir> ./harness.out @@
This command tells AFL++ to begin fuzzing the harness binary, using seed inputs from the directory specified by -i and writing output artifacts (like crashes and coverage data) to the directory given by -o. The @@ token is replaced with the path to each fuzzer-generated input during execution. Further information about AFL++ command line options can be found here
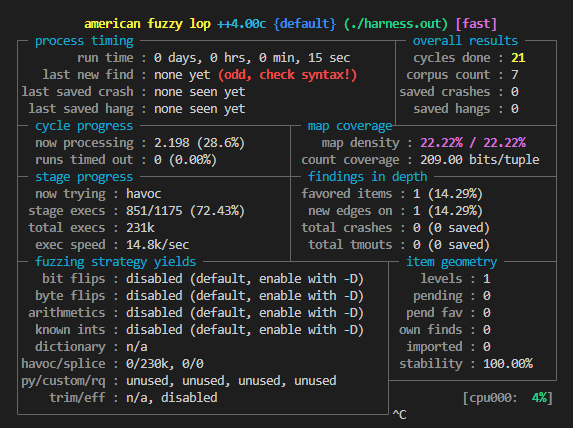
Symptoms of an Ineffective Fuzzing Trial
“New Edges on” Quickly Plateaus
This is advice is target dependent, but if the count of new edges on in the AFL++ UI quickly stops increasing after beginning a fuzzing trial, this should raise some alarms. In the past, I’ve seen a lot of students immediately put the blame on their harness, assuming they are not exercising interesting functionality in the target. While this can be the case, it’s important to ask and answer these two questions:
“Am I linking against the correct library?”
If the harness is statically linked with -l: syntax, the answer to this is almost definitely yes. But, if the harness is dynamically linked, make this check. Especially when fuzzing widely used libraries, that library may already be installed in a common directory like /usr/lib/. Without setting the LD_LIBRARY_PATH environment variable, the harness is likely linking against the uninstrumented version of the library in the environment. To check this, run ldd <path_to_harness>, which will provide the name and path of all libraries dynamically linked by the harness. Make sure the target library’s path is included in this output. If not, set the LD_LIBRARY_PATH environment variable to point to the instrumented build of the library.
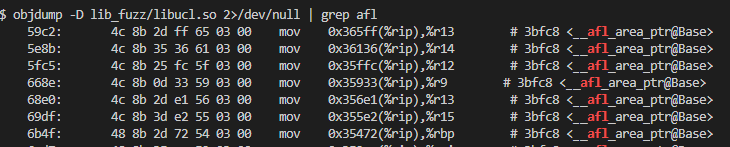
“Is my library actually instrumented?”
Once we’ve made sure we’re linking against the target library build, we can also make sure that the library itself is actually instrumented. Running a command like
objdump -D <path_to_library> | grep afl
should spit out some output highlighting the symbols provided by AFL++. If not, revisit the build section.
High Crash Rate
The harness either found a bug in the target that’s really quick and easy to trigger…or the harness itself is doing something incorrectly. Best to make sure it’s the former over the latter😉.
Conclusion
As demonstrated by the thousands of vulnerabilities discovered with the help of Google’s OSS-Fuzz project, fuzzing harnesses are among the most useful ways to discover high-impact bugs. This guide aims to cover the basics of building a fuzzing a target. By following these three steps, you’ll be well on your way toward impactful fuzzing.
- Choose a meaningful target
- Build it using AFL++ instrumentation
- Begin fuzzing and monitor the trial for common signs of inaccuracy
If you have any further questions, clarifications, or just want to chat, please reach out by email gabesherman6@gmail.com, BlueSky @gabriel-sherman.bsky.social, or X @gabe_sherman6.
Thanks to Keith Hoodlet for providing reviews and advice for this post!
Further Reading + Resources
- AFL++ Tutorials: Great jumping-off point to learn AFL++.
- OSS-Fuzz: Thousands of production-grade harnesses.
- Oss-Fuzz-Introspector: Comprehensive codebase coverage insights.
- casr: Speed up bug discovery with crash deduplication.
- Unlocking the Secrets of Effective Fuzzing Harnesses: A great deep dive into how to maximize the effectiveness of your harness.